Kayak Anchor Setup for Fishing Oklahoma Lakes
There’s nothing quite as frustrating as finally reaching that perfect fishing spot on an Oklahoma lake, only for the wind to immediately push you off target or the current to pull you away from the fish you've worked so hard to find. Kayak anglers especially know this struggle all too well. This guide is here to walk you through everything you need to know about setting up an effective kayak anchor system, so you can stay put, present your bait precisely, and enjoy your time on the water without constantly battling the elements.
Why a Reliable Kayak Anchor is Absolutely Essential
Let's be real, kayak fishing is amazing, offering unparalleled access to shallow coves and tight spaces that bigger boats can't reach. But it also comes with its unique challenges, and staying in one place is often the biggest one. Oklahoma's lakes, from the vast expanses of Lake Texoma to the winding arms of Lake Eufaula, can get surprisingly windy, and currents can be stronger than you might expect, especially near dam outflows or in river sections. Without a solid anchoring system, you're constantly fighting against nature instead of focusing on what you came to do: fish.
Imagine you've located a brush pile holding a school of crappie on Fort Gibson Lake, or you're trying to work a deep-diving crankbait along a submerged ledge for bass on Grand Lake O' the Cherokees. If your kayak is constantly spinning or drifting, your lure presentation suffers, and you end up spooking more fish than you catch. It's not just about convenience; it's about efficiency and effectiveness. A well-designed anchor setup means you can sit still, cast accurately, and really work an area without drifting over it too quickly or having to paddle like crazy every few minutes.
Beyond fishing effectiveness, safety is a huge consideration. Getting blown into hazards like submerged trees or rocky shorelines is a real concern, especially on a windy day. A reliable anchor allows you to hold your position, assess your surroundings, and even take a moment to re-tie a lure or grab a drink without worrying about being carried away. It provides a sense of control and stability that dramatically improves your overall fishing experience, turning potential frustration into pure enjoyment.
Understanding Different Kayak Anchor Types for Oklahoma Waters
When it comes to picking an anchor for your kayak, it's not a one-size-fits-all situation, especially with the varied bottom structures you'll encounter across Oklahoma's diverse fishing spots. Each type has its strengths and weaknesses, and knowing these can help you choose the best option for your typical fishing grounds.
Grappling Anchors for Rocky and Weedy Bottoms
The grappling anchor, often looking like a miniature four-pronged claw, is a go-to for many kayak anglers. Its design allows the "flukes" or prongs to dig into various bottom types, making it quite versatile. They excel in situations where you need something to grab hold of rocks, submerged timber, or even dense vegetation. If you're fishing on lakes like Tenkiller Ferry Lake, known for its clear water and rocky bluffs, or exploring the timber-filled coves of Lake Eufaula, a grappling anchor can really shine.
The downside is that these anchors can sometimes get too good a grip. Snags are a common complaint, especially in areas with heavy cover. However, many grappling anchors are designed with a sliding retrieval ring or can be modified to "trip" when pulled from the opposite direction, making them easier to retrieve from tricky spots. They’re usually compact and fold up nicely for storage, which is a huge plus in a kayak where space is at a premium. You can often find a good selection of these at places like Bass Pro Shops.
Mushroom and Pyramid Anchors for Softer Beds
Mushroom and pyramid anchors are designed for softer bottoms like mud, silt, or sand. Their broad, cup-like or flat-bottomed shape creates suction or digs into the soft sediment, providing good holding power. If your favorite fishing spots are on calmer ponds or sections of larger lakes with a lot of muck, like some of the shallow flats on Lake Texoma or along the shores of Keystone Lake, these anchors can be very effective.
However, they are not ideal for strong currents or rocky bottoms where they tend to drag rather than dig in. In extremely windy conditions or swift currents, a mushroom anchor might struggle to hold a kayak firmly. They also tend to be bulkier than grappling anchors, which can take up more precious space in your kayak. They are often a more affordable option and can be a good starting point for anglers on a budget.
Drag Chains and River Anchors for Controlled Drifting
Sometimes you don't want to completely stop; you just want to slow down your drift to thoroughly work a long stretch of structure or current. This is where a drag chain or river anchor comes into play. A simple length of heavy chain, often 5 to 10 feet long, dragged behind your kayak, provides just enough resistance to slow your progress significantly without anchoring you rigidly in place. This technique is fantastic for covering water slowly while jigging for crappie or drifting live bait for catfish in a river system.
River anchors, which are typically flattened, pyramid-shaped weights with holes to allow water to pass through, offer a similar controlled drift. The beauty of these is their ability to reduce your speed subtly, keeping your bait in the strike zone longer. They are less about "holding" and more about "slowing." These aren't generally used for truly anchoring in one spot but are an invaluable tool for certain fishing techniques, especially when targeting River Bass Limits Differ From Lake Limits in Oklahoma or How to Catch Crappie During the Spring Spawn at Lake Eufaula, Oklahoma.
Essential Components of a Kayak Anchor System
Having just an anchor isn't enough; it's the entire system that makes kayak anchoring effective and safe. You need a few key pieces of gear to ensure you can deploy, retrieve, and adjust your anchor with ease and confidence.
The Anchor Line and Rope Management
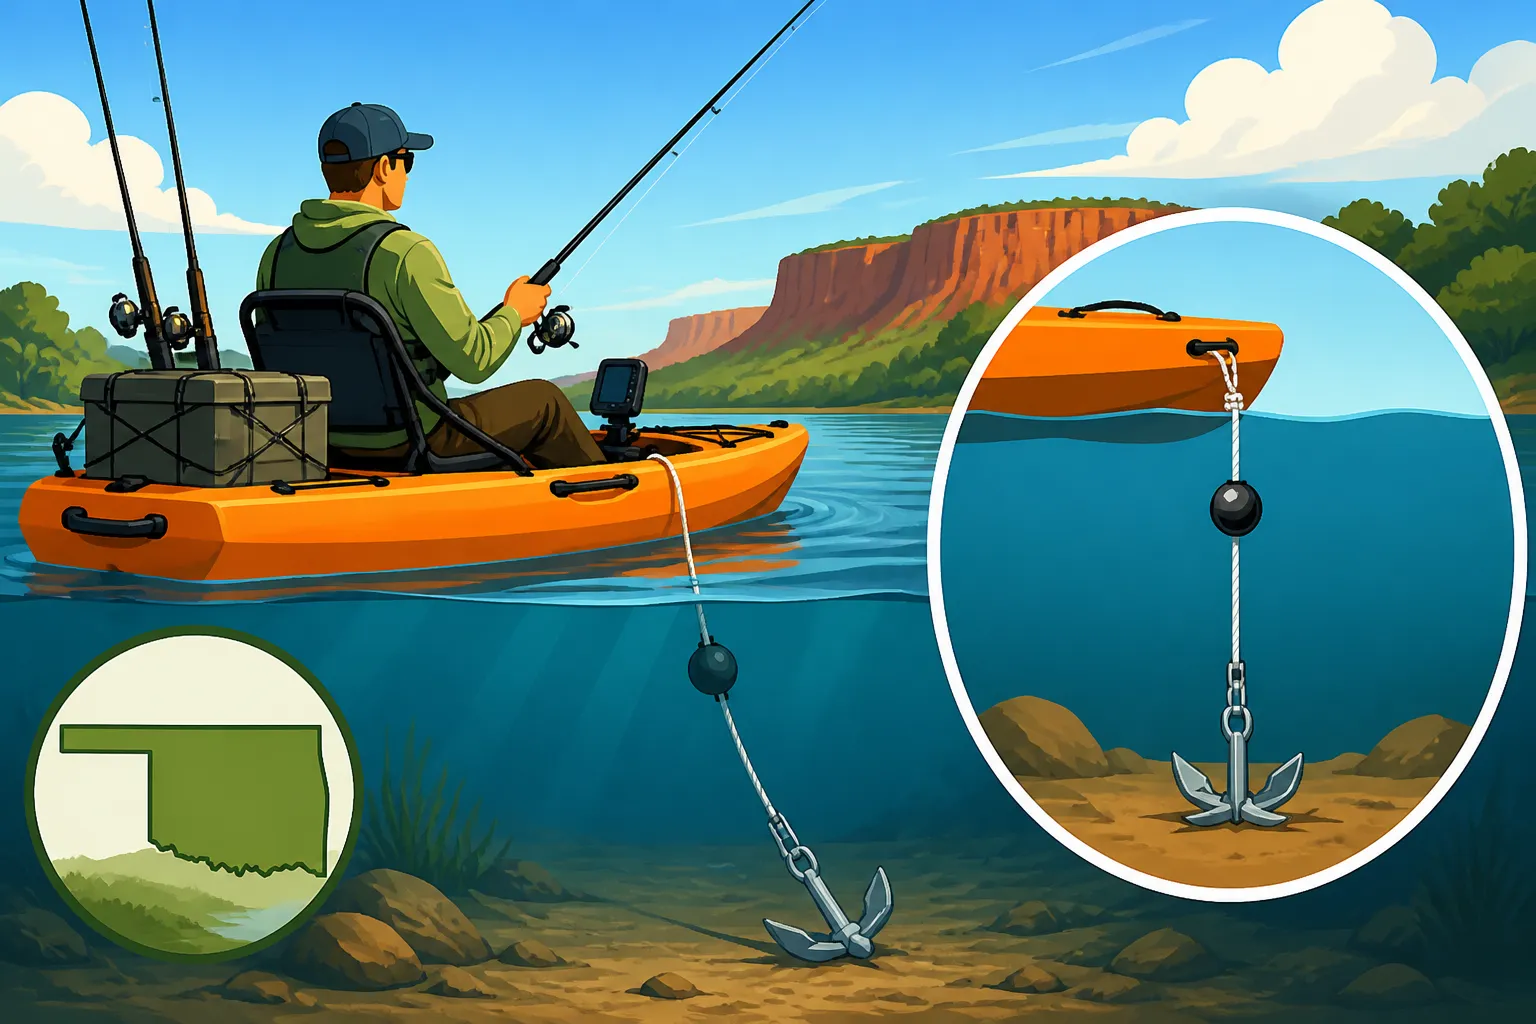
The anchor line is obviously critical. For kayak fishing, a braided nylon rope is usually the best choice because it's strong, has good knot-holding properties, and a little stretch to absorb shock in choppy water. The length of your anchor line is crucial. A good rule of thumb is to have at least three to five times the maximum depth you expect to fish. So, if you plan to anchor in 15 feet of water, you’ll want 45 to 75 feet of line. This allows for enough "scope" – the ratio of line length to water depth – for the anchor to properly set and hold. Too little scope and your anchor will drag.
Think about how you'll manage this line. A simple anchor bag or a small line winder can keep things tidy and prevent tangles, which is the last thing you need when you're trying to quickly deploy or retrieve. Some anglers even use a dedicated anchor cleat to secure the line. You can find quality marine rope and management accessories on Amazon or at local sporting goods stores.
The Anchor Trolley System: A Game Changer
If there's one piece of gear that truly elevates a kayak anchor setup, it's the anchor trolley. This brilliant system allows you to position your anchor line anywhere along the length of your kayak, from bow to stern, without having to awkwardly reach or paddle around. Why is this a game changer? It lets you adjust your kayak's orientation relative to the wind, current, and structure, giving you precise control over your casting angle and drift.
A basic anchor trolley consists of a ring (or two rings connected by a short piece of line) that runs along a continuous loop of rope or bungee cord. This loop is typically mounted on either side of your kayak, running from bow to stern, through small pulleys. When you deploy your anchor, you attach its line to the ring, and then you can slide that ring forward or backward along the side of your kayak using the trolley line. This means you can anchor off the bow to face into the wind, off the stern to cast downwind, or even mid-ship for a different angle. It's an indispensable tool for serious kayak anglers wanting to maximize their time on Best Bass Fishing Lakes Across Oklahoma or Oklahoma's Best Crappie Lakes.
Quick Release and Safety Float
Safety should always be paramount, and an anchor quick release is a simple but vital component. This allows you to rapidly detach your anchor line in an emergency, such as if your anchor gets hopelessly snagged in strong current or if you need to quickly escape a dangerous situation. It can be as simple as a carabiner attached to a cleat, or a dedicated quick-release cleat. When you release the anchor line, it's a good idea to have an anchor float attached to the end of the line. This float will mark where your anchor is, allowing you to retrieve it later once the immediate danger has passed.
Imagine you're fishing a strong current and your anchor snags firmly on a log. Without a quick release, you could be pulled into danger or even capsize. A quick release and float mean you can jettison the anchor line, move to safety, and then return to retrieve your expensive anchor. It's a small investment that offers huge peace of mind. Familiarizing yourself with general Fines for Boating Safety Violations in Oklahoma also helps in understanding the importance of proper safety gear.
| Anchor Component | Purpose | Key Considerations |
|---|---|---|
| Anchor Type | Grabs and holds onto the bottom | Bottom type, weight, foldability |
| Anchor Line | Connects anchor to kayak | Length (3-5x depth), material (braided nylon), strength |
| Anchor Trolley | Positions anchor line anywhere along kayak | Smooth pulleys, secure mounting, easy-to-grab ring |
| Quick Release | Rapidly detaches anchor in emergencies | Easy to operate under pressure, secure attachment point |
| Anchor Float | Marks detached anchor for later retrieval | Visible color, buoyancy, durability |
| Cleats/Tie-Offs | Secures anchor line and trolley line | Strong, securely mounted, non-snagging design |
Step-by-Step Guide to Setting Up Your Kayak Anchor System
Installing and setting up your kayak anchor system might seem a little daunting at first, but with a clear plan, it's a straightforward process that any angler can tackle. Most modern kayaks even come with pre-drilled holes or flat mounting surfaces that make this even easier.
Planning and Mounting the Trolley System
Before you start drilling, lay out all your trolley components and visualize where everything will go. The pulleys for the trolley system should be mounted securely at the bow and stern of your kayak. Some kayaks have dedicated mounting points, while others might require drilling small holes. Always use marine-grade stainless steel hardware and seal any drilled holes with marine-grade silicone to prevent leaks. Run your continuous loop of rope or bungee cord through these pulleys. The length of this loop should allow the anchor ring to travel freely from one end of your kayak to the other.
Next, you'll want to install a small cleat or a similar tie-off point within easy reach of your seating position. This is where you'll secure the trolley line itself, ensuring the anchor ring stays where you want it along the kayak's side. Take your time with this step; a well-mounted trolley is the backbone of an effective anchoring system.
Connecting the Anchor Line and Quick Release
Once your trolley is installed, it's time to prepare your anchor line. Tie one end of your chosen anchor line securely to your anchor. On the other end of the anchor line, create a loop (a figure-eight knot works well) that you can easily attach to the anchor trolley's main ring using a carabiner or directly. This carabiner or a specialized quick-release clip will be your quick-release mechanism. Ensure the quick-release can be easily operated with one hand, even if your hands are wet or cold.
Attach your anchor float to the anchor line a few feet above the anchor. This way, if you need to release the entire line, the float will keep the anchor from sinking to an unretrievable depth and mark its location for later. This system provides a balance of convenience for regular use and essential safety in emergency situations.
Practicing Deployment and Retrieval
The best way to get comfortable with your new anchor system is to practice! Take your kayak out to a calm, shallow area without strong currents or hazards. Practice deploying your anchor:
- Lower the anchor gently into the water from the side of your kayak, feeding out the line.
- Allow sufficient scope (3-5 times the depth) for the anchor to set.
- Use your trolley to move the anchor point from bow to stern to experience how it changes your kayak's orientation.
- Practice securing the anchor line to your cleat.
- Practice the quick release: intentionally drop the anchor line (with the float attached!) to simulate an emergency.
Practice retrieving the anchor, too. Pull in the line hand-over-hand, keeping it neat and free of tangles. If you have a grappling anchor with a "trip" ring, practice retrieving it by pulling from the opposite direction to release it from snags. Getting these motions down in a calm environment will build your confidence for when you're out on a windy day, trying to stay on a hot bite on Lake Texoma Fishing Guide for Oklahoma Anglers.
Tips for Effective Kayak Anchoring in Oklahoma
Even with the best gear, knowing how to use your anchor system effectively can make all the difference between a great day and a frustrating one. There are some specific techniques and considerations that are particularly helpful for fishing Oklahoma's waters.
Reading Wind and Current
Oklahoma weather can be fickle, and wind is often a major factor. Before you deploy your anchor, take a moment to observe the wind direction and any visible current. You'll generally want to anchor upwind or upstream from your target fishing spot. This allows your kayak to drift back into position over the structure or fish, giving you the best casting angle and minimizing the chance of spooking fish as you approach.
For example, if you're targeting a submerged brush pile on Hudson Lake and the wind is blowing from the north, you'd paddle slightly north of the brush pile, deploy your anchor, and then use your anchor trolley to adjust your kayak's position so you're facing south, casting directly at your target. Understanding these dynamics will greatly improve your fishing success and save you a lot of extra paddling. You might also find it helpful to look into How Water Temperature Affects Fishing Timing in Oklahoma as water conditions and currents are often linked.
Deploying and Retrieving Your Anchor Safely
When deploying your anchor, always lower it gently rather than just throwing it overboard. This prevents loud splashes that could spook fish and ensures the line doesn't tangle. Once the anchor is on the bottom, gently pull on the line to help it set into the bottom. Never try to anchor in extremely shallow water if you know the bottom is fragile habitat, or near hazards where a snag could be dangerous.
Retrieval also needs care. If your anchor is snagged, try using your kayak's momentum or paddling around the snagged spot while pulling the line from different angles. This is where a grappling anchor with a sliding retrieval ring truly shines. Always pull the anchor directly up and clean off any mud or weeds before bringing it back into your kayak. This keeps your boat cleaner and prevents the spread of invasive species between lakes. For safety, remember that Do Adults Need to Wear a Life Jacket on an Oklahoma Boat? is not just a question of legality, but good practice, especially when dealing with anchoring in moving water.
Environmental Considerations and Alternative Anchoring Techniques
As responsible anglers, we want to protect the very environments we enjoy. Avoid anchoring directly into sensitive areas like thick weed beds if possible, as pulling up the anchor can damage them. Also, be mindful of other anglers. Don't anchor so close that you impede their casting or drift, especially in popular spots found on Best Fishing Spots in Oklahoma.
For situations where a hard anchor isn't ideal, consider alternative anchoring techniques. A "stake-out pole" can be fantastic for very shallow water, allowing you to quietly pole your way to a spot and then stick the pole into the soft bottom to hold your position. This is much less intrusive than dropping a heavy anchor. Another option, if you have a powered kayak or a trolling motor, is to use a spot-lock feature, which digitally holds your position using GPS. While not a traditional anchor, it achieves the same goal of staying put. Ultimately, whether you're using a physical anchor or advanced electronics, the goal is always to maximize your time fishing and minimize your time fighting your boat.
Disclaimer
This article is for general informational purposes only and does not constitute professional advice. Laws, prices and regulations vary by location and change over time. Consult a qualified professional for guidance on your specific situation.